
插槽 Slots
此章節假設你已經看過了組件基礎。若你還不了解組件是什麼,請先閱讀該章節。
插槽內容與出口
在之前的章節中,我們已經了解到組件能夠接收任意類型的 JavaScript 值作為 props,但組件要如何接收模板內容呢?在某些場景中,我們可能想要為子組件傳遞一些模板片段,讓子組件在它們的組件中渲染這些片段。
舉例來說,這裡有一個 <FancyButton> 組件,可以像這樣使用:
template
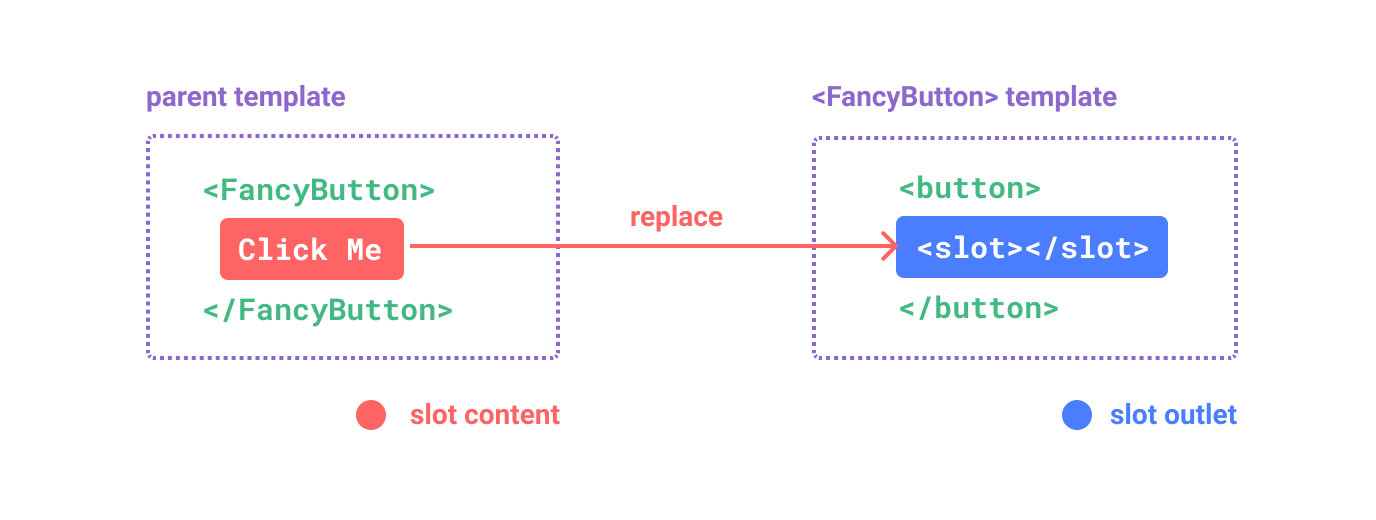
<FancyButton>
  Click me! <!-- 插槽內容 -->
</FancyButton>
而 <FancyButton> 的模板是這樣的:
template
<button class="fancy-btn">
  <slot></slot> <!-- 插槽出口 -->
</button>
<slot> 元素是一個插槽出口 (slot outlet),標示了父元素提供的插槽內容 (slot content) 將在哪裡被渲染。
最終渲染出的 DOM 是這樣:
html
<button class="fancy-btn">Click me!</button>通過使用插槽,<FancyButton> 僅負責渲染外層的 <button> (以及相應的樣式),而其內部的內容由父組件提供。
理解插槽的另一種方式是和下面的 JavaScript 函數作類比,其概念是類似的:
js
// 父元素傳入插槽內容
FancyButton('Click me!')

// FancyButton 在自己的模板中渲染插槽內容
function FancyButton(slotContent) {
  return `<button class="fancy-btn">
      ${slotContent}
    </button>`
}
插槽內容可以是任意合法的模板內容,不局限於文本。例如我們可以傳入多個元素,甚至是組件:
template
<FancyButton>
  <span style="color:red">Click me!</span>
  <AwesomeIcon name="plus" />
</FancyButton>通過使用插槽,<FancyButton> 組件更加靈活和具有可複用性。現在組件可以用在不同的地方渲染各異的內容,但同時還保證都具有相同的樣式。
Vue 組件的插槽機制是受原生 Web Component <slot> 元素的啟發而誕生,同時還做了一些功能拓展,這些拓展的功能我們後面會學習到。
渲染作用域
插槽內容可以訪問到父組件的數據作用域,因為插槽內容本身是在父組件模板中定義的。舉例來說:
template
<span>{{ message }}</span>
<FancyButton>{{ message }}</FancyButton>
這裡的兩個 {{ message }} 插值表達式渲染的內容都是一樣的。
插槽內容無法訪問子組件的數據。Vue 模板中的表達式只能訪問其定義時所處的作用域,這和 JavaScript 的詞法作用域規則是一致的。換言之:
父組件模板中的表達式只能訪問父組件的作用域;子組件模板中的表達式只能訪問子組件的作用域。
默認內容
在外部沒有提供任何內容的情況下,可以為插槽指定默認內容。比如有這樣一個 <SubmitButton> 組件:
template
<button type="submit">
  <slot></slot>
</button>
如果我們想在父組件沒有提供任何插槽內容時在 <button> 內渲染“Submit”,只需要將“Submit”寫在 <slot> 標籤之間來作為默認內容:
template
<button type="submit">
  <slot>
    Submit <!-- 默認內容 -->
  </slot>
</button>
現在,當我們在父組件中使用 <SubmitButton> 且沒有提供任何插槽內容時:
template
<SubmitButton />“Submit”將會被作為默認內容渲染:
html
<button type="submit">Submit</button>但如果我們提供了插槽內容:
template
<SubmitButton>Save</SubmitButton>那麼被顯式提供的內容會取代默認內容:
html
<button type="submit">Save</button>具名插槽
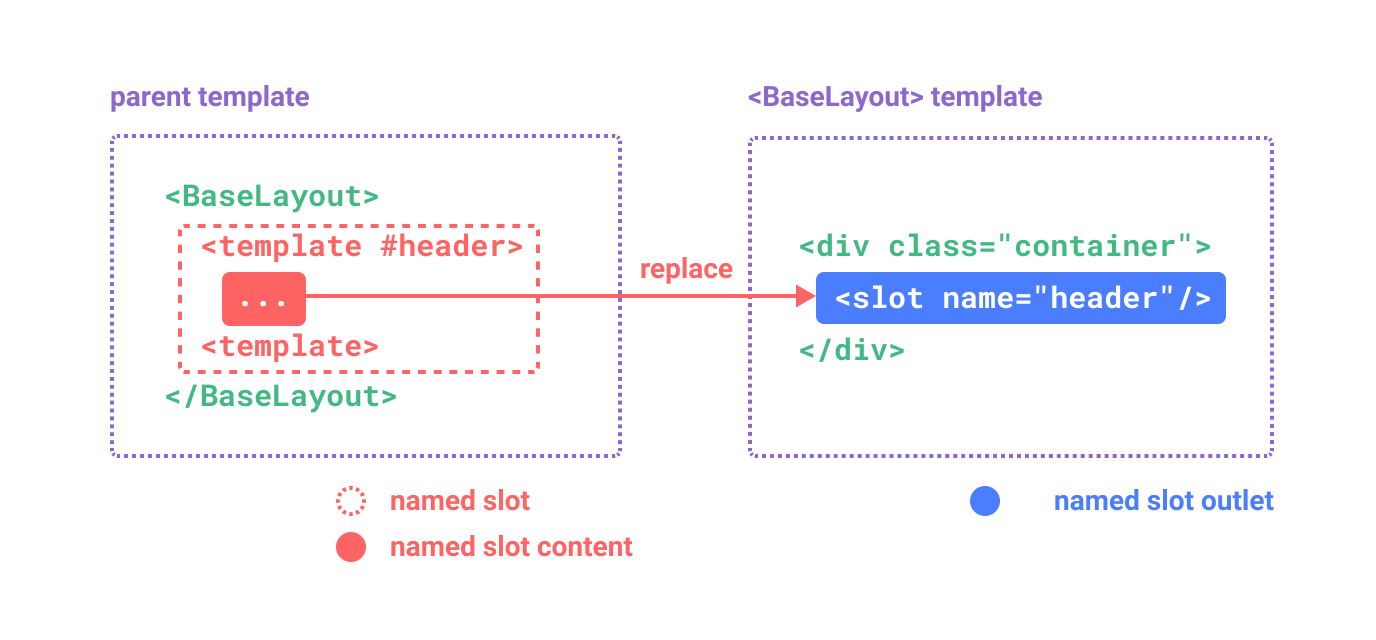
有時在一個組件中包含多個插槽出口是很有用的。舉例來說,在一個 <BaseLayout> 組件中,有如下模板:
template
<div class="container">
  <header>
    <!-- 標題內容放這裡 -->
  </header>
  <main>
    <!-- 主要內容放這裡 -->
  </main>
  <footer>
    <!-- 底部內容放這裡 -->
  </footer>
</div>對於這種場景,<slot> 元素可以有一個特殊的 attribute name,用來給各個插槽分配唯一的 ID,以確定每一處要渲染的內容:
template
<div class="container">
  <header>
    <slot name="header"></slot>
  </header>
  <main>
    <slot></slot>
  </main>
  <footer>
    <slot name="footer"></slot>
  </footer>
</div>
這類帶 name 的插槽被稱為具名插槽 (named slots)。沒有提供 name 的 <slot> 出口會隱式地命名為“default”。
在父組件中使用 <BaseLayout> 時,我們需要一種方式將多個插槽內容傳入到各自目標插槽的出口。此時就需要用到具名插槽了:
要為具名插槽傳入內容,我們需要使用一個含 v-slot 指令的 <template> 元素,並將目標插槽的名字傳給該指令:
template
<BaseLayout>
  <template v-slot:header>
    <!-- header 插槽的內容放這裡 -->
  </template>
</BaseLayout>
v-slot 有對應的簡寫 #,因此 <template v-slot:header> 可以簡寫為 <template #header>。其意思就是“將這部分模板片段傳入子組件的 header 插槽中”。
下面我們給出完整的、向 <BaseLayout> 傳遞插槽內容的代碼,指令均使用的是縮寫形式:
template
<BaseLayout>
  <template #header>
    <h1>Here might be a page title</h1>
  </template>

  <template #default>
    <p>A paragraph for the main content.</p>
    <p>And another one.</p>
  </template>

  <template #footer>
    <p>Here's some contact info</p>
  </template>
</BaseLayout>
當一個組件同時接收默認插槽和具名插槽時,所有位於頂級的非 <template> 節點都被隱式地視為默認插槽的內容。所以上面也可以寫成:
template
<BaseLayout>
  <template #header>
    <h1>Here might be a page title</h1>
  </template>

  <!-- 隱式的默認插槽 -->
  <p>A paragraph for the main content.</p>
  <p>And another one.</p>

  <template #footer>
    <p>Here's some contact info</p>
  </template>
</BaseLayout>
現在 <template> 元素中的所有內容都將被傳遞到相應的插槽。最終渲染出的 HTML 如下:
html
<div class="container">
  <header>
    <h1>Here might be a page title</h1>
  </header>
  <main>
    <p>A paragraph for the main content.</p>
    <p>And another one.</p>
  </main>
  <footer>
    <p>Here's some contact info</p>
  </footer>
</div>使用 JavaScript 函數來類比可能更有助於你來理解具名插槽:
js
// 傳入不同的內容給不同名字的插槽
BaseLayout({
  header: `...`,
  default: `...`,
  footer: `...`
})

// <BaseLayout> 渲染插槽內容到對應位置
function BaseLayout(slots) {
  return `<div class="container">
      <header>${slots.header}</header>
      <main>${slots.default}</main>
      <footer>${slots.footer}</footer>
    </div>`
}
条件插槽
有時候,您可能希望根據插槽的存在與否來渲染內容。
在下面的示例中,我們定義了一個 Card 組件,包含三個條件性插槽:header、footer 和 default。 當 header / footer / default 插槽存在時,我們希望對它們進行包裝,以提供額外的樣式:
template
<template>
  <div class="card">
    <div v-if="$slots.header" class="card-header">
      <slot name="header" />
    </div>

    <div v-if="$slots.default" class="card-content">
      <slot />
    </div>

    <div v-if="$slots.footer" class="card-footer">
      <slot name="footer" />
    </div>
  </div>
</template>動態插槽名
動態指令參數在 v-slot 上也是有效的,即可以定義下面這樣的動態插槽名:
template
<base-layout>
  <template v-slot:[dynamicSlotName]>
    ...
  </template>

  <!-- 縮寫為 -->
  <template #[dynamicSlotName]>
    ...
  </template>
</base-layout>注意這裡的表達式和動態指令參數受相同的語法限制。
作用域插槽
在上面的渲染作用域中我們討論到,插槽的內容無法訪問到子組件的狀態。
然而在某些場景下插槽的內容可能想要同時使用父組件域內和子組件域內的數據。要做到這一點,我們需要一種方法來讓子組件在渲染時將一部分數據提供給插槽。
我們也確實有辦法這麼做!可以像對組件傳遞 props 那樣,向一個插槽的出口上傳遞屬性:
template
<!-- <MyComponent> 的模板 -->
<div>
  <slot :text="greetingMessage" :count="1"></slot>
</div>
當需要接收插槽 props 時,默認插槽和具名插槽的使用方式有一些小區別。下面我們將先展示默認插槽如何接受 props,通過子組件標籤上的 v-slot 指令,直接接收到了一個插槽 props 對象:
template
<MyComponent v-slot="slotProps">
  {{ slotProps.text }} {{ slotProps.count }}
</MyComponent>
子組件傳入插槽的 props 作為了 v-slot 指令的值,可以在插槽內的表達式中訪問。
你可以將作用域插槽類比為一個傳入子組件的函數。子組件會將相應的 props 作為參數傳給它:
js
MyComponent({
  // 類比默認插槽,將其想成一個函數
  default: (slotProps) => {
    return `${slotProps.text} ${slotProps.count}`
  }
})

function MyComponent(slots) {
  const greetingMessage = 'hello'
  return `<div>${
    // 在插槽函數調用時傳入 props
    slots.default({ text: greetingMessage, count: 1 })
  }</div>`
}實際上,這已經和作用域插槽的最終代碼編譯結果、以及手動編寫渲染函數時使用作用域插槽的方式非常類似了。
v-slot="slotProps" 可以類比這裡的函數簽名,和函數的參數類似,我們也可以在 v-slot 中使用解構:
template
<MyComponent v-slot="{ text, count }">
  {{ text }} {{ count }}
</MyComponent>
具名作用域插槽
具名作用域插槽的工作方式也是類似的,插槽 props 可以作為 v-slot 指令的值被訪問到:v-slot:name="slotProps"。當使用縮寫時是這樣:
template
<MyComponent>
  <template #header="headerProps">
    {{ headerProps }}
  </template>

  <template #default="defaultProps">
    {{ defaultProps }}
  </template>

  <template #footer="footerProps">
    {{ footerProps }}
  </template>
</MyComponent>
向具名插槽中傳入 props:
template
<slot name="header" message="hello"></slot>注意插槽上的 name 是一個 Vue 特別保留的屬性,不會作為 props 傳遞給插槽。因此最終 headerProps 的結果是 { message: 'hello' }。
如果你同時使用了具名插槽與默認插槽,則需要為默認插槽使用顯式的 <template> 標籤。嘗試直接為組件添加 v-slot 指令將導致編譯錯誤。這是為了避免因默認插槽的 props 的作用域而困惑。舉例:
template
<!-- 該模板無法編譯 -->
<template>
  <MyComponent v-slot="{ message }">
    <p>{{ message }}</p>
    <template #footer>
      <!-- message 屬於默認插槽,此處不可用 -->
      <p>{{ message }}</p>
    </template>
  </MyComponent>
</template>
為默認插槽使用顯式的 <template> 標籤有助於更清晰地指出 message 屬性在其他插槽中不可用:
template
<template>
  <MyComponent>
    <!-- 使用顯式的默認插槽 -->
    <template #default="{ message }">
      <p>{{ message }}</p>
    </template>

    <template #footer>
      <p>Here's some contact info</p>
    </template>
  </MyComponent>
</template>
高級列表組件示例
你可能想問什麼樣的場景才適合用到作用域插槽,這裡我們來看一個 <FancyList> 組件的例子。它會渲染一個列表,並同時會封裝一些加載遠端數據的邏輯、使用數據進行列表渲染、或者是像分頁或無限滾動這樣更進階的功能。然而我們希望它能夠保留足夠的靈活性,將對單個列表元素內容和樣式的控制權留給使用它的父組件。我們期望的用法可能是這樣的:
template
<FancyList :api-url="url" :per-page="10">
  <template #item="{ body, username, likes }">
    <div class="item">
      <p>{{ body }}</p>
      <p>by {{ username }} | {{ likes }} likes</p>
    </div>
  </template>
</FancyList>
在 <FancyList> 之中,我們可以多次渲染 <slot> 並每次都提供不同的數據 (注意我們這裡使用了 v-bind 來傳遞插槽的 props):
template
<ul>
  <li v-for="item in items">
    <slot name="item" v-bind="item"></slot>
  </li>
</ul>無渲染組件
上面的 <FancyList> 案例同時封裝了可重用的邏輯 (數據獲取、分頁等) 和視圖輸出,但也將部分視圖輸出通過作用域插槽交給了消費者組件來管理。
如果我們將這個概念拓展一下,可以想象的是,一些組件可能只包括了邏輯而不需要自己渲染內容,視圖輸出通過作用域插槽全權交給了消費者組件。我們將這種類型的組件稱為無渲染組件。
這裡有一個無渲染組件的例子,一個封裝了追蹤當前鼠標位置邏輯的組件:
template
<MouseTracker v-slot="{ x, y }">
  Mouse is at: {{ x }}, {{ y }}
</MouseTracker>雖然這個模式很有趣,但大部分可以透過無渲染組件實現的功能都可以通過組合式 API 以另一種更高效的方式實現,並且還不會帶來額外組件嵌套的開銷。之後我們會在組合式函數一章中介紹如何更高效地實現追蹤鼠標位置的功能。
儘管如此,作用域插槽在需要同時封裝邏輯、組合視圖界面時還是很有用,就像上面的 <FancyList> 組件那樣。